在各位手中相比都有开发板或者某客云或者….
那么,在此记录下一次折腾 Armbian 23.02.0-trunk bullseye 的经验。
准备工作
为了安装方便,需要更新下APT的源
打开配置文件
首先先输入 nano /etc/apt/sources.list
修改配置文件
首先,一定一定一定一定不能删除原有的内容,万一要弄回去找不到就麻烦,直接注释原有内容即可。
# 清华大学的软件源
deb https://mirrors.tuna.tsinghua.edu.cn/debian/ bullseye main contrib non-free
# deb-src https://mirrors.tuna.tsinghua.edu.cn/debian/ bullseye main contrib non-free
deb https://mirrors.tuna.tsinghua.edu.cn/debian/ bullseye-updates main contrib non-free
# deb-src https://mirrors.tuna.tsinghua.edu.cn/debian/ bullseye-updates main contrib non-free
deb https://mirrors.tuna.tsinghua.edu.cn/debian/ bullseye-backports main contrib non-free
# deb-src https://mirrors.tuna.tsinghua.edu.cn/debian/ bullseye-backports main contrib non-free
deb https://mirrors.tuna.tsinghua.edu.cn/debian-security bullseye-security main contrib non-free
# deb-src https://mirrors.tuna.tsinghua.edu.cn/debian-security bullseye-security main contrib non-free

# 阿里云的软件源
# deb https://mirrors.aliyun.com/debian/ bullseye main non-free contrib
# deb-src https://mirrors.aliyun.com/debian/ bullseye main non-free contrib
# deb https://mirrors.aliyun.com/debian-security/ bullseye-security main
# deb-src https://mirrors.aliyun.com/debian-security/ bullseye-security main
# deb https://mirrors.aliyun.com/debian/ bullseye-updates main non-free contrib
# deb-src https://mirrors.aliyun.com/debian/ bullseye-updates main non-free contrib
# deb https://mirrors.aliyun.com/debian/ bullseye-backports main non-free contrib
# deb-src https://mirrors.aliyun.com/debian/ bullseye-backports main non-free contrib

# 中科大的软件源
# deb https://mirrors.ustc.edu.cn/debian/ bullseye main contrib non-free
# deb-src https://mirrors.ustc.edu.cn/debian/ bullseye main contrib non-free
# deb https://mirrors.ustc.edu.cn/debian/ bullseye-updates main contrib non-free
# deb-src https://mirrors.ustc.edu.cn/debian/ bullseye-updates main contrib non-free
# deb https://mirrors.ustc.edu.cn/debian/ bullseye-backports main contrib non-free
# deb-src https://mirrors.ustc.edu.cn/debian/ bullseye-backports main contrib non-free
# deb https://mirrors.ustc.edu.cn/debian-security bullseye-security main contrib non-free
# deb-src https://mirrors.ustc.edu.cn/debian-security bullseye-security main contrib non-free
以上软件源只适用于 bullseye 的系统,别放到别的系统去了
这里就推荐阿里云的源了
修改完毕后,键入 Ctrl+O 然后,键入 Enter,再次键入 Ctrl+X 退出 nano
更新&升级
这就简单了,直接输入 apt-get update,然后再输入 apt-get upgrade
安装 Nginx 和 PHP
话不多说开始吧
安装 Nginx
直接输入 apt-get install nginx -y
然后等待安装完毕即可
安装PHP 7.4
这玩意很多人用吧,所以安装这个,直接复制粘贴命令
apt install php7.4-fpm php7.4-mysql php7.4-curl php7.4-gd php7.4-mbstring php7.4-xml php7.4-xmlrpc php7.4-zip php7.4-opcache php7.4-bcmath -y
然后等待安装完毕,OK了老铁们。
安装 Mysql phpMyAdmin
安装 Mysql
Debian10 及以上默认软件源中不再包含MySQL软件包,而是被MariaDB取代
所以直接复制粘贴 apt-get install mariadb-server -y
然后输入 mysql_secure_installation 至命令行进行MariaDB设置向导
等等?报错了?如果这个地方提示错误的话,可以重启MariaDB服务,输入 service mariadb start (基本不会)
Enter current password for root (设置Root密码,输入完回车)
Switch to unix_socket authentication [Y/n] (回车)
Set root password? [Y/n] (再输一遍,回车)
Re-enter new password: (再再输入一边,回车)
Remove anonymous users? [Y/n] (回车)
Disallow root login remotely? [Y/n] (他的意思是是否禁止Root远程登陆,直接输入n然后回车)
Remove test database and access to it? [Y/n] (test数据库?删了删了直接回车)
Reload privilege tables now? [Y/n] (是否重新加载权限表并使之生效,回车)
然后呢,输入一下 service mariadb restart 重启下Mysql就ok了
安装 phpMyAdmin
直接去官网下载 phpMyAdmin
或者复制粘贴 wget https://files.phpmyadmin.net/phpMyAdmin/5.2.1/phpMyAdmin-5.2.1-all-languages.zip
下载完毕后就解压 unzip phpMyAdmin-5.2.1-all-languages.zip
然后给他重命名下 mv phpMyAdmin-5.2.1-all-languages phpMyAdmin
创建网站给 phpMyAdmin 并且移动至新文件夹
mkdir /opt/www && mv phpMyAdmin /opt/www/
配置 vhost
配置 phpMyAdmin 的 vhost
复制粘贴 nano /etc/nginx/conf.d/phpmyadmin.conf
这个是创建一个 phpMyAdmin 的 vhost 的配置文件
输入以下内容:
server {
    listen 8889 default_server;
    listen [::]:8889 default_server;

    root /opt/www/phpMyAdmin;
    index index.php;
    location / {
        index index.php index.html;
        if ( !-e $request_filename){
            rewrite ^/(.*)$ /index.php?s=$1 last;
            break;
        }
    }
    location ~ .*\.(gif|jpg|jpeg|png|bmp|swf)$ {
        expires 30d;
    }
    location ~ .*\.(js|css)?$ {
        expires 30d;
    }
    location ~ .*\.(php|php5)?$ {
        include snippets/fastcgi-php.conf;
        fastcgi_pass unix:/run/php/php7.4-fpm.sock;
    }
}
保存退出即可,然后输入 service nginx restart
修改配置文件(实际上没有修改也可以用)
输入 vim /opt/sites/phpMyAdmin/libraries/config.default.php
修改
$cfg['PmaAbsoluteUri'] = '';
为
$cfg['PmaAbsoluteUri'] = 'http://127.0.0.1:8889/';
按需要修改以下内容,如果在同一台主机上,则无需修改
$cfg['Servers'][$i]['host'] = 'localhost';
$cfg['Servers'][$i]['port'] = '';
修改数据库用户名和密码
$cfg['Servers'][$i]['user'] = 'root';
$cfg['Servers'][$i]['password'] = '';
修改为
$cfg['Servers'][$i]['user'] = '你的数据库用户名';
$cfg['Servers'][$i]['password'] = '你的数据库密码';
修改认证方法
默认为
$cfg['Servers'][$i]['auth_type'] = 'cookie';
不需要修改,使用默认的cookie方式即可。使用了cookie需要配置短语密码:
$cfg['blowfish_secret'] = '不能留空,越长越好';
配置完成之后就可以直接登录了
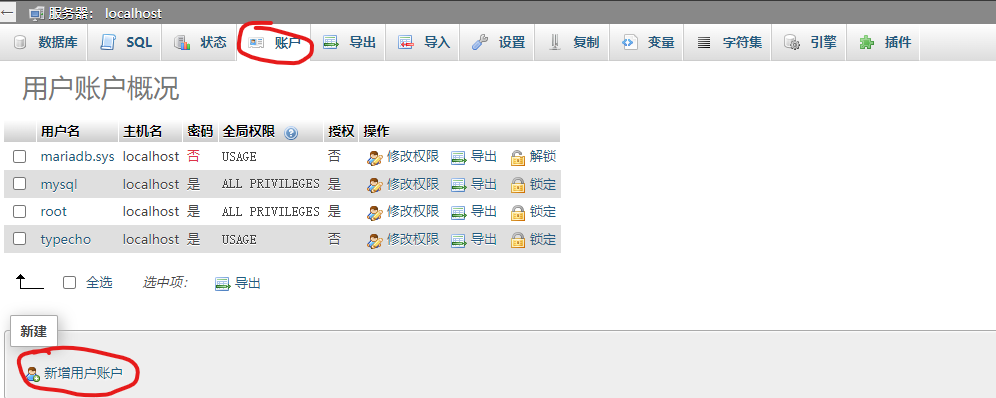
使用 phpMyAdmin 创建数据库
点击账户,然后点击新建用户账户
主机名选择本地,用户账户数据库下面的两项勾选上,其他的按照自己的需要填写就行
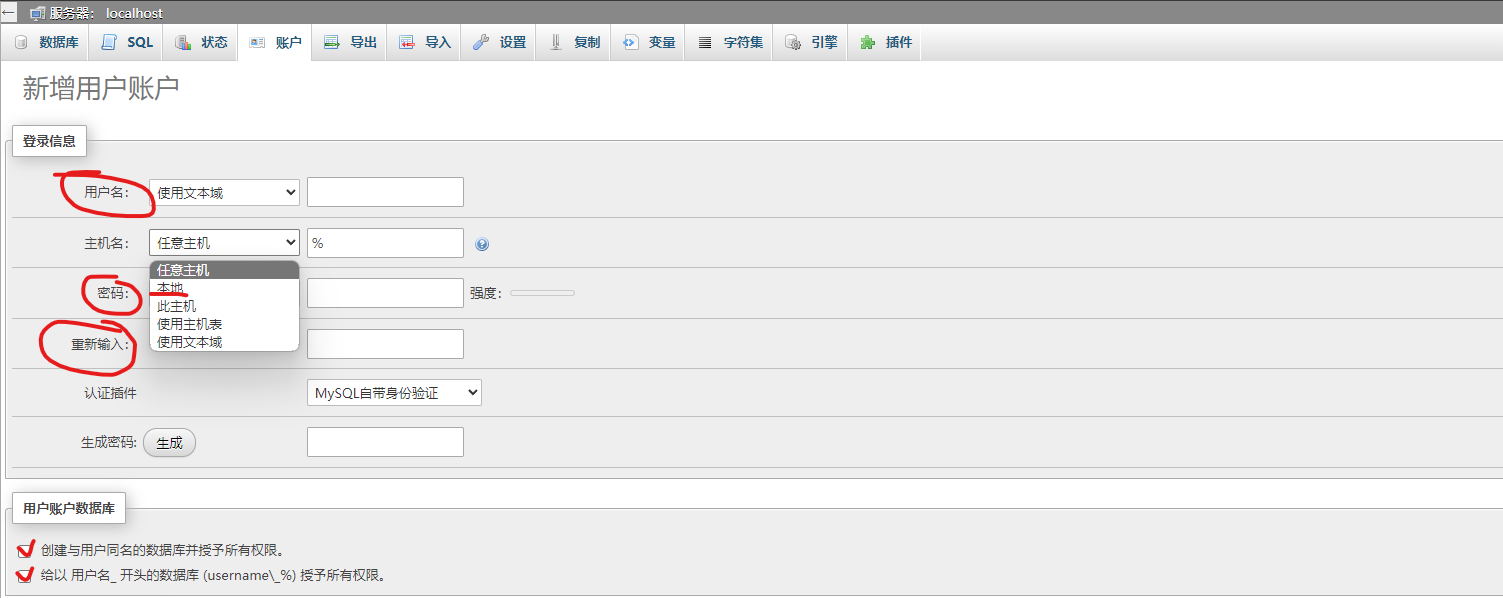 创建完毕就ok了,可以本地链接数据库测试下